
Tasty No-Crust Peach Treat for Summer
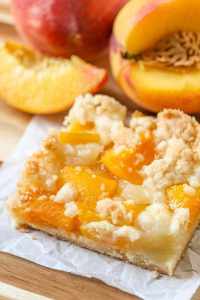
## Warm Peach Crisp with Cinnamon Oat Topping
Warm, bubbling slices of peaches, accented by a touch of cinnamon, are baked beneath a buttery oat topping that’s crispy and golden, resulting in a dessert that’s simpler than pie yet just as pleasurable. This peach crisp is a charming way to savor fresh summer peaches, making it an ideal addition to any dessert spread.
### Flavor Profile
The blend of juicy, sweet-tart peaches and a crunchy, oat-rich topping creates a sweet treat for summertime. The hint of cinnamon amplifies the natural tastes of the peaches, ensuring that every bite is a pleasurable experience.
### Skill Level
Crisps, similar to cobblers and crumbles, are free-form desserts that deliver the flavors of pies without the intricate steps, rendering them very accessible for beginners. This recipe is excellent for those new to baking or anyone seeking a straightforward yet delicious dessert.
### Preparation Notes
You can put together the peach crisp up to a day in advance. Just refrigerate it and bake when you’re set to serve. This adaptability makes it a superb choice for gatherings or spur-of-the-moment entertaining.
### Serving Suggestions
For an interesting twist, bake mini-peach crisps in ramekins for individual snacking. Pair the warm crisp with a scoop of vanilla ice cream, a dollop of homemade whipped cream, or a drizzle of caramel sauce for a luxurious treat.
### Ingredient Tips for Peach Crisp
– **Peaches**: Fresh peaches are ideal for this dish. You may peel them or leave the skins on for a rustic appearance. If fresh peaches aren’t available, frozen (thawed) or canned (drained) peaches are suitable alternatives.
– **Topping**: For a gluten-free variation, replace all-purpose flour with a gluten-free blend. Rolled oats are recommended for optimal texture. Incorporating shredded coconut can add extra sweetness and texture.
– **Nuts**: Boost the crisp with nuts such as pecans, walnuts, almonds, or pistachios. For a nut-free option, sunflower or pumpkin seeds are great substitutes. Toasting the nuts in a dry skillet before mixing them into the topping can enhance their flavor.
– **Variations**: Don’t restrict yourself to just peaches! Feel free to combine sliced strawberries, blueberries, chopped cherries, raisins, or currants for a fruit blend.
### Tips for the Best Peach Crisp
– Sample the peaches before adding sugar to modify sweetness as required.
– Avoid overmixing the topping; maintaining small chunks of butter will yield the best texture.
– Let the crisp rest for 10-15 minutes prior to serving to allow the fruit mixture to thicken slightly, making it easier to dish out.
### Keeping Peach Crisp Fresh
Store any leftover peach crisp covered in the refrigerator for up to 3 days or in the freezer for up to 4 months. It can be enjoyed cold or reheated in the microwave, oven, or air fryer. To restore the crispiness of the topping, place portions briefly under the broiler.
### Nutritional Information (Per Serving)
– **Calories**: 334
– **Carbohydrates**: 46g
– **Protein**: 3g
– **Fat**: 17g
– **Saturated Fat**: 8g
– **Cholesterol**: 31mg
– **Sodium**: 109mg
– **Potassium**: 306mg
– **Fiber**: 3g
– **Sugar**: 34g
– **Vitamin A**: 731 IU
– **Vitamin C**: 8mg
– **Calcium**: 41mg
– **Iron**: 1mg
### Conclusion
This warm peach crisp is a delightful dessert that embodies the spirit of summer. With its straightforward preparation and delicious flavors, it’s destined to become a cherished favorite in your household. Savor it warm, topped with your preferred accompaniments, and relish the sweet essence of summer in every bite!
Crispy Crushed Potato Salad Recipe
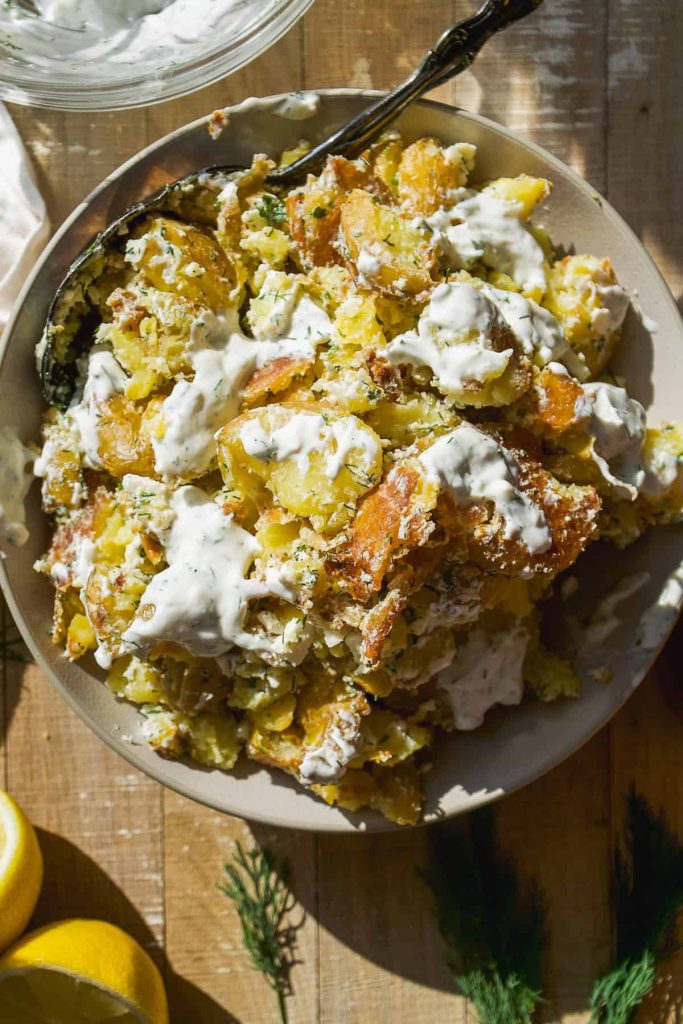
### Smashed Potato Salad: The Ideal Summer Delight
Tangy salad, crunchy potatoes, and smooth ranch – this smashed potato salad is the quintessential summer meal that merges enjoyable textures and tastes. It’s a revitalizing take on standard potato salad, making it an excellent selection for picnics, barbecues, or laid-back lunches.
#### Why This Salad Is Unique
For those who cherish the traditional Midwestern trio of a shredded salad, crispy fries, and decadent ranch dressing, this smashed potato salad delivers on all fronts. In contrast to standard picnic-style potato salads, this variation adopts a more lettuce-forward style, maintaining the crunchy texture of the potatoes while providing a delightful crunch with every mouthful.
The salad is not just zesty and striking but also hearty yet light, making it an enjoyable choice for summer dining. Adding tuna can enhance the dish for dinner, giving an extra protein boost, but the original blend of tangy salad, crispy potatoes, and smooth ranch truly shines.
#### Ingredients
**Crispy Smashed Potatoes**
– Small potatoes (Yukon Gold or red varieties are excellent)
**Salad**
– Romaine lettuce
– Pickles
– Red onions
**Dressing**
– Homemade ranch dressing (or pre-packaged)
#### Instructions
1. **Cook the Potatoes**: Bring a pot of salted water to a boil. Add the potatoes and cook until tender (15-25 minutes, based on size).
2. **Prepare the Veggies**: While the potatoes are boiling, dice the romaine, pickles, and onions.
3. **Make the Dressing**: Whisk together all ingredients for the ranch dressing while the potatoes are cooking.
4. **Smash the Potatoes**: Once the potatoes are done and cool enough to handle, use the back of a flat drinking glass to flatten each potato to about 1/4 to 1/8 inch thick.
5. **Roast the Potatoes**: Place the smashed potatoes in a single layer in an air fryer basket. Spray with avocado oil, season, and air fry at 375°F for around 15 minutes until golden and crisp. (Alternatively, bake in the oven at 375°F for 30-45 minutes.)
6. **Serve**: Combine the romaine, pickles, and onions with the dressing. Fold in half of the crispy potatoes and set aside the remaining half to top the salad. Savor the crunchy, fresh, and creamy flavors together!
#### Notes
– The potatoes can also be baked for a crunchier texture.
– This salad is easily adaptable with extra ingredients such as cherry tomatoes or avocado.
### Conclusion
Smashed potato salad is a delightful summer dish that blends the finest crispy, creamy, and tangy flavors. Whether enjoyed as a side or a main course, it’s guaranteed to be a favorite at any gathering. Relish this refreshing salad that brings happiness with every bite!

Tuscan Salad with Bread (Panzanella)
**Tuscan Bread Salad (Panzanella): An Italian Culinary Treasure**
Panzanella, an iconic Tuscan bread salad, is a colorful and revitalizing dish that captures the spirit of Italian gastronomy. Hailing from the simple kitchens of Tuscany, this salad exemplifies the region’s knack for turning modest, everyday ingredients into a culinary gem. Typically savored during the sunny summer months, Panzanella celebrates fresh produce and ingeniously utilizes stale bread.
**Origins and History**
The roots of Panzanella can be traced to the Italian countryside, where farmers and laborers maximized their available resources. The dish emerged from necessity, crafted as a method to use stale bread along with the plentiful garden vegetables. Over the years, it transformed into a cherished dish that highlights the region’s vibrant flavors.
The term “Panzanella” is thought to originate from the Italian words “pane,” signifying bread, and “zanella,” meaning a deep dish or bowl. Traditionally, the salad was prepared with onions and seasoned with olive oil and vinegar. However, as tomatoes became a staple in Italian cooking, they were included in the recipe, enriching it with color and taste.
**Ingredients and Preparation**
Panzanella is defined by its straightforwardness and emphasis on premium ingredients. The primary elements of the salad encompass:
1. **Stale Bread**: Typically, unsalted and dense Tuscan bread is utilized. The bread is cut into cubes and soaked in water to soften, then pressed to eliminate excess liquid. This technique allows the bread to soak up the dressing and vegetable flavors.
2. **Tomatoes**: Fresh, succulent tomatoes are crucial to Panzanella, offering a sweet and tart contrast to the bread, often taking center stage in the dish.
3. **Cucumbers**: Crisp cucumbers bring a zesty crunch that counterbalances the richness of other ingredients.
4. **Red Onions**: Thinly sliced red onions provide a sharp, spicy flavor that pairs well with the sweetness of the tomatoes.
5. **Basil**: Fresh basil leaves contribute a fragrant scent and a touch of peppery zest.
6. **Olive Oil and Vinegar**: A hearty splash of top-quality extra virgin olive oil and a dash of red wine vinegar or balsamic vinegar create a simple yet delicious dressing that unifies the salad.
7. **Seasoning**: Salt and freshly ground black pepper enhance the inherent flavors of the ingredients.
To make Panzanella, the bread is soaked, squeezed, and mixed with the diced vegetables and basil. The salad is then dressed with olive oil and vinegar, seasoned, and permitted to rest for a while, allowing the flavors to blend harmoniously.
**Variations and Serving Suggestions**
Although the traditional recipe is well-loved, Panzanella is adaptable and can be modified to reflect personal tastes or seasonal offerings. Variations may include adding bell peppers, capers, olives, or mozzarella cheese. Grilled veggies or roasted peppers can also be integrated for a smoky flavor enhancement.
Panzanella is generally served as a light lunch or side dish, often paired with grilled meats or fish. It complements a chilled glass of white wine beautifully, making it an ideal selection for outdoor dining.
**Conclusion**
Tuscan bread salad, known as Panzanella, is an exquisite representation of Italian culinary heritage. Its uncomplicated nature, focus on fresh ingredients, and ability to turn leftovers into a delightful meal render it a timeless favorite. Whether relished as an appetizer, a side, or a main dish, Panzanella provides a taste of Tuscany that is equally satisfying and revitalizing.

A Manual for Crafting the Ideal Matcha
# The Delight of Everyday Matcha: A Personal Insight
I enjoy matcha at least once daily. Not in the morning – typically in the afternoon, as a way to pause and relish the small moments in life. It’s invigorating, loaded with antioxidants, and absolutely scrumptious. It transports me back to when we resided in Japan, where I tried to slow down and appreciate the changing seasons despite being in the ever-bustling Tokyo.
## Matcha Green Tea
Matcha is taking the world by storm – from matcha lattes to cakes, breads, ice creams, croissants, popcorn, and cookies – there appears to be no limit to the global fascination with matcha-flavored items. It’s no wonder that matcha is the top favorite flavor of sweets in Japan. From the traditional tea ceremony to more laid-back lattes in trendy cafes, matcha is a vital part of Japanese culture.
**Matcha green tea is the truest representation of this.** I yearn for the matcha culture in Japan. I never realized how much matcha green tea I consumed until we departed! From twist-cap cold matcha from convenience stores to adorable matcha cafes, I indulged in so much matcha that I’m astonished I didn’t turn green.
## What is Matcha?
Matcha is a powdered green tea derived from dried green tea leaves. The powdered tea originates from shade-grown leaves and contains no stems or veins. The color of matcha is strikingly vibrant green due to exceptionally high chlorophyll levels.
## What Does Matcha Taste Like?
Matcha presents a sweet, vegetal grassy flavor with a touch of nuttiness and mild bitter notes. It’s like an elevated version of green tea!
## Is Matcha Good for You?
Absolutely! Green tea is known for its antioxidants, but matcha is on another level when it comes to health benefits, as you ingest the entire tea leaf. The antioxidants in matcha aid in lowering the risk of heart disease, enhancing metabolism, and reducing blood pressure.
## Does Matcha Have Caffeine?
Matcha contains more caffeine than standard green tea and is roughly equivalent to coffee. Unlike coffee, it doesn’t induce a jittery effect because matcha includes a unique amino acid (L-Theanine) that moderates the release of caffeine and promotes a sense of calming relaxation.
## Which Brand Should I Buy?
If you intend to drink your matcha with just water, opt for ceremonial grade – we recommend [Ippodo brand from Japan](https://amzn.to/36qyvcH).
If you prefer your matcha mixed with milk or sweetener and plan to use it in recipes, culinary matcha is more economical and gets the job done. [Ito En culinary matcha](https://amzn.to/33tX4Ux) is a great option – I love their bottled cold green tea, so it stands to reason that their culinary matcha is excellent as well.
## Culinary vs Ceremonial Matcha Powder
Not all matcha is equal and it can be somewhat perplexing. Generally, the pricier the matcha, the higher the quality. The primary distinction lies in the age of the green tea plants: the youngest plants yield a sweeter, intense, rich, and smooth flavor that is used for ceremonial matcha. Older plants are utilized to produce culinary matcha.
– **Ceremonial matcha** is employed in traditional Japanese tea ceremonies where they prepare *koicha* – a form of thick matcha. Because koicha is quite potent, only the finest matcha is used since it’s solely mixed with water and never utilized for lattes or desserts. Essentially, ceremonial matcha has no other ingredients to hide behind. However, even within ceremonial matcha, there are different grades available.
– **Culinary matcha** is typically used for making cakes, cookies, and other treats or dishes. Culinary matcha is usually harvested from older plants in the autumn. Again, there are various grades of culinary matcha, and since there’s no standardized grading, culinary matcha can vary from very good to subpar.
## Do I Need a Chasen/Matcha Whisk?
You don’t require a matcha whisk and holder, but if you possess one, making matcha will be infinitely more fulfilling and simpler. Traditional matcha whisks, known as *chasen*, are crafted from a single piece of bamboo and feature numerous flexible whisks specifically designed to blend matcha into a creamy, emulsified mixture.
The advantages of a chasen are twofold: because they are made from bamboo, they won’t scratch your bowls, and due to their multiple prongs, they can froth your matcha more effectively than a metal whisk. If you obtain a matcha whisk, it’s advisable to also get the holder – *kusenaoshi* – as well.

Classic Wedge Salad with Blue Cheese Dressing
**Classic Wedge Salad Recipe**
This traditional wedge salad recipe showcases crunchy iceberg lettuce, rich homemade blue cheese dressing, and toasted breadcrumbs for the ideal effortless side. It’s prepared in merely 15 minutes and complements nearly any dish.
### Ingredients
**For the Salad:**
– 1 recipe Blue Cheese Dressing
– 1 small head iceberg lettuce
– 1 cup cherry tomatoes, quartered (or 4 sundried tomatoes, chopped)
– 2 chives, thinly sliced
– 3 tablespoons blue cheese crumbles
– Smoky breadcrumbs, for topping (1 handful crushed potato chips or crumbled bacon)
**For the Smoky Breadcrumbs:**
– 1 tablespoon olive oil
– ½ cup panko (or homemade breadcrumbs)
– 1 teaspoon smoked paprika
– ½ teaspoon each onion powder and garlic powder
– ¼ heaping teaspoon kosher salt
### Instructions
1. **Prepare the Blue Cheese Dressing.**
2. **Prepare the Smoky Breadcrumbs (if using):** Warm olive oil in a small skillet over medium heat. In a separate bowl, combine panko with smoked paprika, onion powder, garlic powder, and kosher salt. Add to the skillet and toast, stirring often, until golden and crunchy, about 2 to 3 minutes. Transfer to a bowl.
3. **Prepare the Lettuce:** Take off the outer leaves of the iceberg head, then slice into wedges (4 for a small head, 6 for a large head). Prepare the chives and tomatoes.
4. **Serve:** Set a wedge on a plate. Top with dressing, tomatoes, chives, blue cheese crumbles, and smoky breadcrumbs. Serve right away.
### Notes
– *Not a blue cheese fan?* Create Ranch Dressing and incorporate ½ teaspoon smoked paprika for a smoky twist. Then finish with crumbled feta cheese.
This wedge salad is vegetarian and gluten-free, making it a flexible option for diverse dietary needs. Relish it as a side dish or pair it with your preferred meal for a refreshing and fulfilling addition.
Tasty No-Crust Peach Treat for Summer
## Warm Peach Crisp with Cinnamon Oat Topping
Warm, bubbling slices of peaches, accented by a touch of cinnamon, are baked beneath a buttery oat topping that’s crispy and golden, resulting in a dessert that’s simpler than pie yet just as pleasurable. This peach crisp is a charming way to savor fresh summer peaches, making it an ideal addition to any dessert spread.
### Flavor Profile
The blend of juicy, sweet-tart peaches and a crunchy, oat-rich topping creates a sweet treat for summertime. The hint of cinnamon amplifies the natural tastes of the peaches, ensuring that every bite is a pleasurable experience.
### Skill Level
Crisps, similar to cobblers and crumbles, are free-form desserts that deliver the flavors of pies without the intricate steps, rendering them very accessible for beginners. This recipe is excellent for those new to baking or anyone seeking a straightforward yet delicious dessert.
### Preparation Notes
You can put together the peach crisp up to a day in advance. Just refrigerate it and bake when you’re set to serve. This adaptability makes it a superb choice for gatherings or spur-of-the-moment entertaining.
### Serving Suggestions
For an interesting twist, bake mini-peach crisps in ramekins for individual snacking. Pair the warm crisp with a scoop of vanilla ice cream, a dollop of homemade whipped cream, or a drizzle of caramel sauce for a luxurious treat.
### Ingredient Tips for Peach Crisp
– **Peaches**: Fresh peaches are ideal for this dish. You may peel them or leave the skins on for a rustic appearance. If fresh peaches aren’t available, frozen (thawed) or canned (drained) peaches are suitable alternatives.
– **Topping**: For a gluten-free variation, replace all-purpose flour with a gluten-free blend. Rolled oats are recommended for optimal texture. Incorporating shredded coconut can add extra sweetness and texture.
– **Nuts**: Boost the crisp with nuts such as pecans, walnuts, almonds, or pistachios. For a nut-free option, sunflower or pumpkin seeds are great substitutes. Toasting the nuts in a dry skillet before mixing them into the topping can enhance their flavor.
– **Variations**: Don’t restrict yourself to just peaches! Feel free to combine sliced strawberries, blueberries, chopped cherries, raisins, or currants for a fruit blend.
### Tips for the Best Peach Crisp
– Sample the peaches before adding sugar to modify sweetness as required.
– Avoid overmixing the topping; maintaining small chunks of butter will yield the best texture.
– Let the crisp rest for 10-15 minutes prior to serving to allow the fruit mixture to thicken slightly, making it easier to dish out.
### Keeping Peach Crisp Fresh
Store any leftover peach crisp covered in the refrigerator for up to 3 days or in the freezer for up to 4 months. It can be enjoyed cold or reheated in the microwave, oven, or air fryer. To restore the crispiness of the topping, place portions briefly under the broiler.
### Nutritional Information (Per Serving)
– **Calories**: 334
– **Carbohydrates**: 46g
– **Protein**: 3g
– **Fat**: 17g
– **Saturated Fat**: 8g
– **Cholesterol**: 31mg
– **Sodium**: 109mg
– **Potassium**: 306mg
– **Fiber**: 3g
– **Sugar**: 34g
– **Vitamin A**: 731 IU
– **Vitamin C**: 8mg
– **Calcium**: 41mg
– **Iron**: 1mg
### Conclusion
This warm peach crisp is a delightful dessert that embodies the spirit of summer. With its straightforward preparation and delicious flavors, it’s destined to become a cherished favorite in your household. Savor it warm, topped with your preferred accompaniments, and relish the sweet essence of summer in every bite!
Read More
Crispy Crushed Potato Salad Recipe
### Smashed Potato Salad: The Ideal Summer Delight
Tangy salad, crunchy potatoes, and smooth ranch – this smashed potato salad is the quintessential summer meal that merges enjoyable textures and tastes. It’s a revitalizing take on standard potato salad, making it an excellent selection for picnics, barbecues, or laid-back lunches.
#### Why This Salad Is Unique
For those who cherish the traditional Midwestern trio of a shredded salad, crispy fries, and decadent ranch dressing, this smashed potato salad delivers on all fronts. In contrast to standard picnic-style potato salads, this variation adopts a more lettuce-forward style, maintaining the crunchy texture of the potatoes while providing a delightful crunch with every mouthful.
The salad is not just zesty and striking but also hearty yet light, making it an enjoyable choice for summer dining. Adding tuna can enhance the dish for dinner, giving an extra protein boost, but the original blend of tangy salad, crispy potatoes, and smooth ranch truly shines.
#### Ingredients
**Crispy Smashed Potatoes**
– Small potatoes (Yukon Gold or red varieties are excellent)
**Salad**
– Romaine lettuce
– Pickles
– Red onions
**Dressing**
– Homemade ranch dressing (or pre-packaged)
#### Instructions
1. **Cook the Potatoes**: Bring a pot of salted water to a boil. Add the potatoes and cook until tender (15-25 minutes, based on size).
2. **Prepare the Veggies**: While the potatoes are boiling, dice the romaine, pickles, and onions.
3. **Make the Dressing**: Whisk together all ingredients for the ranch dressing while the potatoes are cooking.
4. **Smash the Potatoes**: Once the potatoes are done and cool enough to handle, use the back of a flat drinking glass to flatten each potato to about 1/4 to 1/8 inch thick.
5. **Roast the Potatoes**: Place the smashed potatoes in a single layer in an air fryer basket. Spray with avocado oil, season, and air fry at 375°F for around 15 minutes until golden and crisp. (Alternatively, bake in the oven at 375°F for 30-45 minutes.)
6. **Serve**: Combine the romaine, pickles, and onions with the dressing. Fold in half of the crispy potatoes and set aside the remaining half to top the salad. Savor the crunchy, fresh, and creamy flavors together!
#### Notes
– The potatoes can also be baked for a crunchier texture.
– This salad is easily adaptable with extra ingredients such as cherry tomatoes or avocado.
### Conclusion
Smashed potato salad is a delightful summer dish that blends the finest crispy, creamy, and tangy flavors. Whether enjoyed as a side or a main course, it’s guaranteed to be a favorite at any gathering. Relish this refreshing salad that brings happiness with every bite!
Read More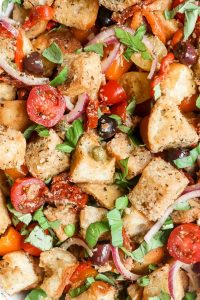
Tuscan Salad with Bread (Panzanella)
**Tuscan Bread Salad (Panzanella): An Italian Culinary Treasure**
Panzanella, an iconic Tuscan bread salad, is a colorful and revitalizing dish that captures the spirit of Italian gastronomy. Hailing from the simple kitchens of Tuscany, this salad exemplifies the region’s knack for turning modest, everyday ingredients into a culinary gem. Typically savored during the sunny summer months, Panzanella celebrates fresh produce and ingeniously utilizes stale bread.
**Origins and History**
The roots of Panzanella can be traced to the Italian countryside, where farmers and laborers maximized their available resources. The dish emerged from necessity, crafted as a method to use stale bread along with the plentiful garden vegetables. Over the years, it transformed into a cherished dish that highlights the region’s vibrant flavors.
The term “Panzanella” is thought to originate from the Italian words “pane,” signifying bread, and “zanella,” meaning a deep dish or bowl. Traditionally, the salad was prepared with onions and seasoned with olive oil and vinegar. However, as tomatoes became a staple in Italian cooking, they were included in the recipe, enriching it with color and taste.
**Ingredients and Preparation**
Panzanella is defined by its straightforwardness and emphasis on premium ingredients. The primary elements of the salad encompass:
1. **Stale Bread**: Typically, unsalted and dense Tuscan bread is utilized. The bread is cut into cubes and soaked in water to soften, then pressed to eliminate excess liquid. This technique allows the bread to soak up the dressing and vegetable flavors.
2. **Tomatoes**: Fresh, succulent tomatoes are crucial to Panzanella, offering a sweet and tart contrast to the bread, often taking center stage in the dish.
3. **Cucumbers**: Crisp cucumbers bring a zesty crunch that counterbalances the richness of other ingredients.
4. **Red Onions**: Thinly sliced red onions provide a sharp, spicy flavor that pairs well with the sweetness of the tomatoes.
5. **Basil**: Fresh basil leaves contribute a fragrant scent and a touch of peppery zest.
6. **Olive Oil and Vinegar**: A hearty splash of top-quality extra virgin olive oil and a dash of red wine vinegar or balsamic vinegar create a simple yet delicious dressing that unifies the salad.
7. **Seasoning**: Salt and freshly ground black pepper enhance the inherent flavors of the ingredients.
To make Panzanella, the bread is soaked, squeezed, and mixed with the diced vegetables and basil. The salad is then dressed with olive oil and vinegar, seasoned, and permitted to rest for a while, allowing the flavors to blend harmoniously.
**Variations and Serving Suggestions**
Although the traditional recipe is well-loved, Panzanella is adaptable and can be modified to reflect personal tastes or seasonal offerings. Variations may include adding bell peppers, capers, olives, or mozzarella cheese. Grilled veggies or roasted peppers can also be integrated for a smoky flavor enhancement.
Panzanella is generally served as a light lunch or side dish, often paired with grilled meats or fish. It complements a chilled glass of white wine beautifully, making it an ideal selection for outdoor dining.
**Conclusion**
Tuscan bread salad, known as Panzanella, is an exquisite representation of Italian culinary heritage. Its uncomplicated nature, focus on fresh ingredients, and ability to turn leftovers into a delightful meal render it a timeless favorite. Whether relished as an appetizer, a side, or a main dish, Panzanella provides a taste of Tuscany that is equally satisfying and revitalizing.
Read More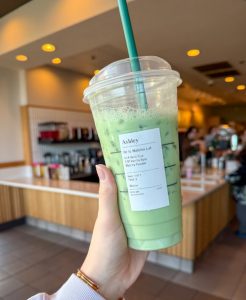
A Manual for Crafting the Ideal Matcha
# The Delight of Everyday Matcha: A Personal Insight
I enjoy matcha at least once daily. Not in the morning – typically in the afternoon, as a way to pause and relish the small moments in life. It’s invigorating, loaded with antioxidants, and absolutely scrumptious. It transports me back to when we resided in Japan, where I tried to slow down and appreciate the changing seasons despite being in the ever-bustling Tokyo.
## Matcha Green Tea
Matcha is taking the world by storm – from matcha lattes to cakes, breads, ice creams, croissants, popcorn, and cookies – there appears to be no limit to the global fascination with matcha-flavored items. It’s no wonder that matcha is the top favorite flavor of sweets in Japan. From the traditional tea ceremony to more laid-back lattes in trendy cafes, matcha is a vital part of Japanese culture.
**Matcha green tea is the truest representation of this.** I yearn for the matcha culture in Japan. I never realized how much matcha green tea I consumed until we departed! From twist-cap cold matcha from convenience stores to adorable matcha cafes, I indulged in so much matcha that I’m astonished I didn’t turn green.
## What is Matcha?
Matcha is a powdered green tea derived from dried green tea leaves. The powdered tea originates from shade-grown leaves and contains no stems or veins. The color of matcha is strikingly vibrant green due to exceptionally high chlorophyll levels.
## What Does Matcha Taste Like?
Matcha presents a sweet, vegetal grassy flavor with a touch of nuttiness and mild bitter notes. It’s like an elevated version of green tea!
## Is Matcha Good for You?
Absolutely! Green tea is known for its antioxidants, but matcha is on another level when it comes to health benefits, as you ingest the entire tea leaf. The antioxidants in matcha aid in lowering the risk of heart disease, enhancing metabolism, and reducing blood pressure.
## Does Matcha Have Caffeine?
Matcha contains more caffeine than standard green tea and is roughly equivalent to coffee. Unlike coffee, it doesn’t induce a jittery effect because matcha includes a unique amino acid (L-Theanine) that moderates the release of caffeine and promotes a sense of calming relaxation.
## Which Brand Should I Buy?
If you intend to drink your matcha with just water, opt for ceremonial grade – we recommend [Ippodo brand from Japan](https://amzn.to/36qyvcH).
If you prefer your matcha mixed with milk or sweetener and plan to use it in recipes, culinary matcha is more economical and gets the job done. [Ito En culinary matcha](https://amzn.to/33tX4Ux) is a great option – I love their bottled cold green tea, so it stands to reason that their culinary matcha is excellent as well.
## Culinary vs Ceremonial Matcha Powder
Not all matcha is equal and it can be somewhat perplexing. Generally, the pricier the matcha, the higher the quality. The primary distinction lies in the age of the green tea plants: the youngest plants yield a sweeter, intense, rich, and smooth flavor that is used for ceremonial matcha. Older plants are utilized to produce culinary matcha.
– **Ceremonial matcha** is employed in traditional Japanese tea ceremonies where they prepare *koicha* – a form of thick matcha. Because koicha is quite potent, only the finest matcha is used since it’s solely mixed with water and never utilized for lattes or desserts. Essentially, ceremonial matcha has no other ingredients to hide behind. However, even within ceremonial matcha, there are different grades available.
– **Culinary matcha** is typically used for making cakes, cookies, and other treats or dishes. Culinary matcha is usually harvested from older plants in the autumn. Again, there are various grades of culinary matcha, and since there’s no standardized grading, culinary matcha can vary from very good to subpar.
## Do I Need a Chasen/Matcha Whisk?
You don’t require a matcha whisk and holder, but if you possess one, making matcha will be infinitely more fulfilling and simpler. Traditional matcha whisks, known as *chasen*, are crafted from a single piece of bamboo and feature numerous flexible whisks specifically designed to blend matcha into a creamy, emulsified mixture.
The advantages of a chasen are twofold: because they are made from bamboo, they won’t scratch your bowls, and due to their multiple prongs, they can froth your matcha more effectively than a metal whisk. If you obtain a matcha whisk, it’s advisable to also get the holder – *kusenaoshi* – as well.
Read More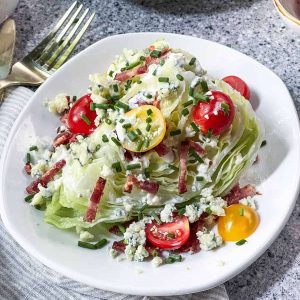
Classic Wedge Salad with Blue Cheese Dressing
**Classic Wedge Salad Recipe**
This traditional wedge salad recipe showcases crunchy iceberg lettuce, rich homemade blue cheese dressing, and toasted breadcrumbs for the ideal effortless side. It’s prepared in merely 15 minutes and complements nearly any dish.
### Ingredients
**For the Salad:**
– 1 recipe Blue Cheese Dressing
– 1 small head iceberg lettuce
– 1 cup cherry tomatoes, quartered (or 4 sundried tomatoes, chopped)
– 2 chives, thinly sliced
– 3 tablespoons blue cheese crumbles
– Smoky breadcrumbs, for topping (1 handful crushed potato chips or crumbled bacon)
**For the Smoky Breadcrumbs:**
– 1 tablespoon olive oil
– ½ cup panko (or homemade breadcrumbs)
– 1 teaspoon smoked paprika
– ½ teaspoon each onion powder and garlic powder
– ¼ heaping teaspoon kosher salt
### Instructions
1. **Prepare the Blue Cheese Dressing.**
2. **Prepare the Smoky Breadcrumbs (if using):** Warm olive oil in a small skillet over medium heat. In a separate bowl, combine panko with smoked paprika, onion powder, garlic powder, and kosher salt. Add to the skillet and toast, stirring often, until golden and crunchy, about 2 to 3 minutes. Transfer to a bowl.
3. **Prepare the Lettuce:** Take off the outer leaves of the iceberg head, then slice into wedges (4 for a small head, 6 for a large head). Prepare the chives and tomatoes.
4. **Serve:** Set a wedge on a plate. Top with dressing, tomatoes, chives, blue cheese crumbles, and smoky breadcrumbs. Serve right away.
### Notes
– *Not a blue cheese fan?* Create Ranch Dressing and incorporate ½ teaspoon smoked paprika for a smoky twist. Then finish with crumbled feta cheese.
This wedge salad is vegetarian and gluten-free, making it a flexible option for diverse dietary needs. Relish it as a side dish or pair it with your preferred meal for a refreshing and fulfilling addition.
Read More
Easy and Tasty Corn Fritters Recipe
Alex & Sonja: The Culinary Team Behind A Couple Cooks
Alex and Sonja Overhiser are the exceptional pair behind the well-known culinary site, A Couple Cooks. As the authors of two successful cookbooks and busy parents, they have successfully established a niche in the realm of food blogging by expressing their enthusiasm for straightforward, seasonal recipes. Their adventure began in 2010 when they chose to develop a platform that would not only highlight their culinary artistry but also share the joy of cooking with a larger audience.
The couple’s method to cooking is based on simplicity and seasonality. They advocate for utilizing fresh, local ingredients to craft dishes that are both tasty and nourishing. This philosophy is apparent in the thousands of original recipes they have crafted over the years. Each recipe is carefully written and beautifully photographed by Alex and Sonja, ensuring that their audience receives an exhaustive guide to recreating these meals at home.
Beyond recipes, A Couple Cooks provides an abundance of cooking tips and meal planning suggestions. Alex and Sonja recognize the difficulties of balancing a hectic lifestyle with the wish to prepare healthy meals for their family. Consequently, they offer practical advice and techniques to assist their readers in optimizing their cooking processes and making meal preparation a pleasurable endeavor.
A unique feature of A Couple Cooks is that all recipes are tested on their children, guaranteeing that the dishes are family-friendly and appealing to a variety of tastes. This dedication to quality and genuineness has garnered Alex and Sonja a devoted following of readers who trust their knowledge and value their down-to-earth perspective on cooking.
Through their website, cookbooks, and social media presence, Alex and Sonja persist in inspiring home cooks across the globe. Their commitment to sharing the joys of cooking and their genuine passion for food and family radiate in all they do, making A Couple Cooks a cherished resource for anyone eager to improve their culinary skills and relish the process of crafting delicious meals.
Read More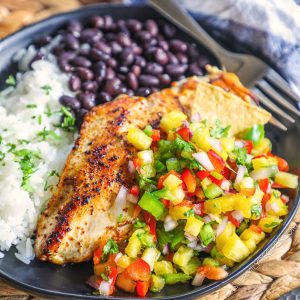
Pineapple Salsa featuring Fresh and Tangy Tastes
### About the Author: Holly Nilsson
Holly Nilsson is the inventive mind behind Spend With Pennies, a site devoted to sharing simple and comforting recipes designed for daily life. With a profound enthusiasm for nostalgic tastes and easy cooking methods, Holly enables busy home cooks to craft delectable meals that are both fulfilling and dependable.
Her culinary adventure is not solely centered on cooking; it’s about crafting unforgettable moments around the dining table. Holly’s recipes frequently draw from classic comfort foods, reinterpreted to meet the demands of contemporary families. She holds the belief that cooking should be both accessible and enjoyable, which is evident in her clear-cut approach to developing recipes.
Alongside her efforts on Spend With Pennies, Holly is the author of “Everyday Comfort.” This cookbook aims to motivate readers with hearty, homemade meals that invoke warmth and reminiscence. Each recipe is crafted to be user-friendly, ensuring that even beginner cooks can whip up delightful dishes that bring happiness to their families.
For those interested in exploring more of Holly’s culinary designs, you can find her posts and recipes on her website: [See more posts by Holly](https://www.spendwithpennies.com/author/holly/).
### Follow Holly on Social Media
Stay linked with Holly and explore more of her delicious recipes by following her on social media:
– [Pinterest](https://www.pinterest.com/spendpennies/)
– [Facebook](https://www.facebook.com/ispendwithpennies/)
– [Twitter](http://spendpennies)
– [Instagram](https://www.instagram.com/spendpennies/)

Grilled Chicken Skewers with Peanut Dipping Sauce: An Easy Recipe with Striking Taste
### Chicken Satay with Creamy Coconut Curry Sauce
Tender chicken pieces marinated in a rich coconut curry sauce, skewered and grilled, paired with a zesty peanut sauce create a delicious meal that is both appetizing and fulfilling. This recipe merges the deep, fragrant flavors of coconut and curry with the crunch of peanuts, making it an ideal option for a substantial meal or a starter for social events.
#### Flavor Profile
This delectable dish showcases succulent chicken imbued with a mixture of coconut milk, soy sauce, brown sugar, garlic, and curry powder. The side peanut sauce, crafted with peanut butter, lime juice, and a touch of ginger, brings a tangy twist that complements the marinated chicken wonderfully.
#### Preparation Notes
– **Make Ahead**: You can prep the chicken satay a day before and grill it when needed, making it an efficient choice for meal preparation.
– **Time-Saving Tips**: The peanut sauce can be made up to two days in advance and kept in the fridge. For faster prep, consider using pre-cut chicken.
#### Recommended Tools
A meat thermometer is crucial to confirm the chicken reaches an internal temperature of 165°F for safe consumption.
### Ingredient Tips for Chicken Satay
– **Chicken**: Choose boneless, skinless chicken breasts sliced into strips for even cooking.
– **Marinade**: Select full-fat coconut milk for a richer taste. Discard any leftover marinade to prevent contamination.
– **Peanut Sauce**: Opt for smooth or chunky peanut butter, and modify the heat level with Sambal or sriracha to suit your palate.
### Variations
– Incorporate vegetables like red bell peppers, zucchini, or mushrooms onto the skewers for a vibrant and healthy meal.
– Swap chicken thighs for pork or shrimp for a different protein alternative.
– Utilize honey or maple syrup in place of brown sugar for a natural sweetener.
### Cooking Tips
– Cut chicken pieces evenly to ensure consistent cooking.
– Soak wooden skewers in water for at least 30 minutes to prevent them from burning on the grill.
– Strive for a slight char on the chicken to enhance flavor.
### Serving Suggestions
Present the chicken satay warm, accompanied by the spicy peanut dipping sauce. Garnish with chopped peanuts and fresh cilantro for extra flavor and visual appeal.
### Leftovers
Store any remaining chicken in a covered container in the fridge for up to four days. Reheat briefly in the microwave or air fryer. The peanut sauce can be stored for up to a week in a tightly sealed jar.
### Freezing Instructions
To freeze, remove the chicken from the skewers and place in zippered bags. It can be frozen for up to four months; thaw in the refrigerator before reheating.
### Nutritional Information (per serving)
– **Calories**: 524
– **Protein**: 46g
– **Carbohydrates**: 22g
– **Fat**: 29g
– **Sodium**: 1473mg
This chicken satay recipe is not only tasty but also adaptable, allowing for different variations to fit your flavor preferences. Savor this Asian-inspired dish as a main meal or an enticing appetizer at your next event!
Read More
Revitalizing Effervescent Lemonade Drink
Here’s a method to prepare invigorating sparkling lemonade at home using just three easy ingredients! This fizzy summer beverage is ideal for gatherings and requires only 5 minutes to whip up.
As the heat rises, I often find myself longing for something chilled, sparkling, and pleasantly tangy. That’s when I reach for this sparkling lemonade recipe! Alex and I have been refining this straightforward three-ingredient drink for years, and I can truly say it has become a family favorite during the summer.
There’s a bit of enchantment in the vibrant citrus taste paired with those charming bubbles—the ultimate combination of sweetness and tartness! I appreciate that there are no artificial flavors or high fructose corn syrup: only pure, refreshing taste.
Ingredients for sparkling lemonade
The components for homemade sparkling lemonade are straightforward: you only require 3 items to prepare a zesty glass! Here’s everything you’ll need:
– Lemons: You’ll want lemon juice squeezed from fresh lemons: skip the bottled lemon juice! For one serving, use 1 large or 2 small lemons.
– Simple syrup: Simple syrup is a breeze to create at home using sugar and water. Prepare a batch and keep it in the fridge for your lemonade or cocktail needs.
– Soda water: You can purchase your own sparkling water or club soda, or create your own using a Soda Stream (my preferred choice!).
Make it by the glass or in a pitcher
Once your ingredients are ready, simply combine them! The main way I enjoy making it is by the glass, as you get fresh fizziness directly in your cup. However, if you’re hosting and wish to serve a group, going with a pitcher is also an option!
– By the glass: The recipe below yields 10 ounces or 1 ½ cups of sparkling lemonade—perfect for on-demand enjoyment.
– Pitcher: For gatherings, prepare a pitcher that provides 8 servings of 1 cup each. Note that leftovers won’t last well due to the sparkling water.
My favorite techniques for juicing lemons
After crafting hundreds of lemonade glasses, I’ve discovered the most effective ways to extract maximum juice:
– Best tool: A press juicer is my first choice. It yields more juice than any other method I’ve encountered and keeps seeds contained.
– Second choice: A handheld citrus reamer with ridges functions effectively and requires no special tools.
If you plan to hand squeeze, a helpful tip is to slice lemons in half crosswise (not lengthwise) and squeeze over a fine-mesh strainer to catch seeds. This is certainly more labor-intensive, so opt for a press juicer if possible!
Elevate it with clear ice
Want a stylish glass of sparkling lemonade that resembles the one in the pictures? Prepare a batch of clear ice! Clear ice is homemade ice that’s crystal clear, unlike the typical cloudy ice.
You can cut it into large, naturally shaped cubes, resembling ice from an upscale bar or restaurant. We utilize clear ice in many of our cocktail recipes: and it works well for sparkling lemonade too.
Cocktails that incorporate sparkling lemonade
You can blend this homemade sparkling lemonade into cocktail recipes, offering a wonderfully bright citrus flavor. In fact, Alex and I initially created this recipe while crafting a Summer Shandy.
– Summer Shandy: A shandy is a British beer cocktail that combines beer and sparkling lemonade or ginger ale. Also consider a Classic Shandy.
– Pimm’s Cup: This British cocktail is refreshing and bubbly, featuring Pimm’s No. 1 and sparkling lemonade. It’s ideal for summer (and often enjoyed at Wimbledon, if you’re a tennis enthusiast like I am.)
Additional refreshing summer beverages
If this sparkling lemonade tantalizes your taste buds, give these other refreshing drinks a try:
You can also incorporate soda water into these beverages to convert them into sparkling lemonade! There’s something incredibly satisfying about crafting a simple, delightful drink from scratch that brings people together: share your thoughts in the comments below.
Dietary notes
This sparkling lemonade recipe is vegetarian, vegan, plant-based, dairy-free and gluten-free.
Homemade Sparkling Lemonade
Here’s a method to prepare invigorating sparkling lemonade at home using just three easy ingredients! This fizzy summer beverage is ideal for gatherings and requires only 5 minutes to whip up.
Author: Sonja Overhiser
Prep Time: 5 minutes
Cook Time: 0 minutes
Total Time: 5 minutes
Yield: 1 drink
Category: Drink
Method: Stirred
Cuisine: American
Diet: Vegan
Ingredients
– 2 ounces (¼ cup) simple syrup
– 2 ounces (¼ cup) fresh lemon juice (1 large or 2 small lemons)
– 8 ounces (1 cup) soda water
Instructions
1. Single glass: In the serving glass, stir the simple syrup and lemon juice. Add ice and top with
Read More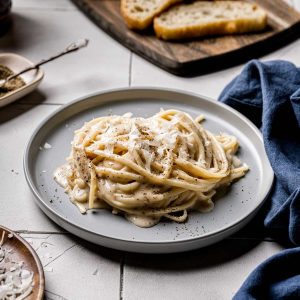
Protein-Enhanced Cacio e Pepe Recipe
**Protein-Packed Cacio e Pepe Recipe: A Healthy Take on a Timeless Dish**
Cacio e Pepe, the iconic Roman pasta creation, is celebrated for its straightforwardness and robust flavors. Typically crafted using only three components—pasta, Pecorino Romano cheese, and black pepper—this dish exemplifies the elegance of straightforward Italian cuisine. However, for those wanting to increase their protein level, a few tweaks can turn this classic into a protein-packed delight without compromising its genuine flavor.
**Ingredients:**
– 200g whole wheat spaghetti or protein-fortified pasta
– 100g Pecorino Romano cheese, finely shredded
– 1 tablespoon freshly crushed black pepper
– 100g grilled chicken breast, cubed
– 50g chickpea flour
– 2 tablespoons olive oil
– Salt, to taste
**Instructions:**
1. **Cook the Pasta:**
– Fill a large pot with salted water and bring it to a boil. Add the whole wheat or protein-fortified pasta and cook until al dente, according to the package directions. Set aside about 1 cup of pasta water before draining.
2. **Boost the Protein:**
– While the pasta is boiling, warm olive oil in a large skillet over medium heat. Incorporate the chickpea flour and stir continuously for approximately 2-3 minutes until it turns a golden hue. This process not only elevates the protein content but adds a pleasant nuttiness to the dish.
3. **Prepare the Sauce:**
– Slowly pour the reserved pasta water into the skillet with chickpea flour, stirring constantly to develop a smooth, creamy sauce. Add more water if needed to reach the preferred texture.
4. **Mix in Cheese and Pepper:**
– Lower the heat and mix in the grated Pecorino Romano cheese and freshly ground black pepper into the sauce. Stir until the cheese melts and the sauce becomes velvety. Season with salt if necessary.
5. **Mix and Serve:**
– Add the cooked pasta and cubed grilled chicken breast into the skillet. Toss everything together until the pasta is thoroughly coated with the sauce and the chicken is evenly mixed in.
6. **Garnish and Enjoy:**
– Serve right away, topped with extra Pecorino Romano and a dash of black pepper for an added punch.
**Nutritional Advantages:**
This protein-packed rendition of Cacio e Pepe provides numerous nutritional benefits. Whole wheat or protein-fortified pasta delivers increased fiber and protein compared to standard pasta, enhancing digestion and muscle recovery. Chickpea flour is a wonderful source of plant-based protein that contributes a delicate nuttiness. Grilled chicken breast is a lean protein that complements the dish’s flavors without overshadowing its traditional essence. Collectively, these ingredients form a balanced meal that promotes muscle growth and overall wellness.
**Final Thoughts:**
By incorporating protein-rich components into the classic Cacio e Pepe, you can savor a delightful, healthful meal that fulfills both your cravings and nutritional requirements. This recipe preserves the core of the original dish while presenting a contemporary twist that appeals to those in search of more protein. Whether you’re an athlete, a fitness lover, or simply an admirer of Italian fare, this protein-packed Cacio e Pepe is bound to become a cherished addition to your cooking collection.
Read More